The Orphanage: Difference between revisions
mNo edit summary |
No edit summary |
||
| (3 intermediate revisions by the same user not shown) | |||
| Line 1: | Line 1: | ||
{{Dungeon Summary | {{Dungeon Summary | ||
| Related Quests = [[Aerbax's Prodigal Shadow]], [[Yaja's Reach Quest]] | | Related Quests = [[Aerbax's Prodigal Shadow]], [[Yaja's Reach Quest]] | ||
| Wiki Map File = | | Wiki Map File = | ||
| ACmaps.com ID = 6548 | | ACmaps.com ID = 6548 | ||
| Coordinates = Random on [[Caul]] | | Coordinates = Random on [[Caul]] | ||
| Landblock = | | Landblock = 6548 | ||
| Dereth Map = {{Map Point|90.9|S|90.9|W|Marker=Dungeon}} | | Dereth Map = {{Map Point|90.9|S|90.9|W|Marker=Dungeon}} | ||
| Nearest Town = | | Nearest Town = | ||
| Nearest LS = | | Nearest LS = | ||
| Route = The random portal can spawn anywhere on [[Singularity Caul]]. [[The Orphanage (Portal Gem) | Portal gems]] can also be | | Route = The random portal can spawn anywhere on [[Singularity Caul]]. [[The Orphanage (Portal Gem)|Portal gems]] can also be obtained as a reward from the [[Dens of Iniquity]] high stakes. | ||
| Level Restrictions = 90 | |||
| Level Restrictions = 90 | | Tieable = | ||
| Tieable = | | Recallable = | ||
| Recallable = | | Summonable = | ||
| Summonable = | |||
| Lifestone if Log = | | Lifestone if Log = | ||
| Quest Flag = | | Quest Flag = | ||
}} | }} | ||
== | == Notes == | ||
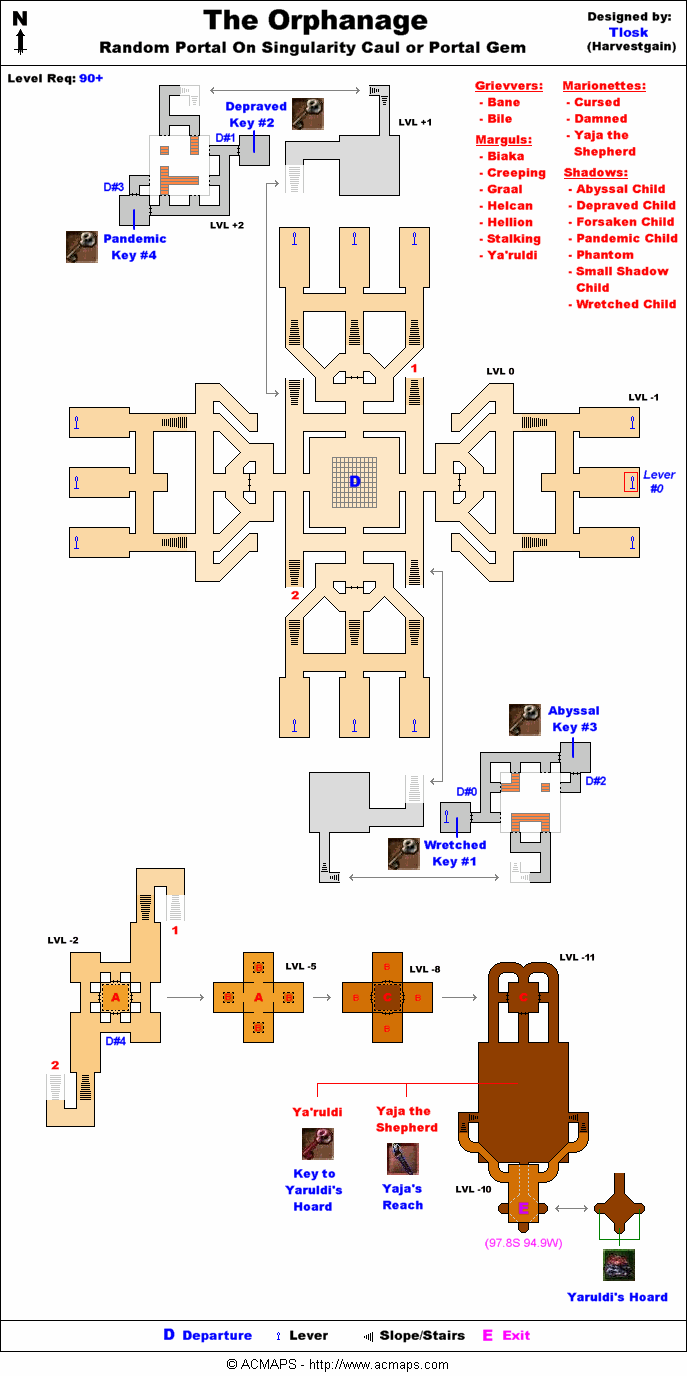
Traversing this dungeon is fairly complicated. | Traversing this dungeon is fairly complicated. | ||
# From the drop, use the lever in the middle room of the east wing. | |||
# Southeast of the drop room, take the hallway leading up and pick up the [[Wretched Key]]. | |||
# Go back down and northwest of the drop room, take the hallway leading up. Use the Wretched Key to open the door and pick up a [[Depraved Key]]. | |||
# Backtrack and return to where you got the first key. Use the Depraved Key to open the door and pick up an [[Abyssal Key]]. | |||
# Backtrack to the NW again and use the Abyssal Key to open the room containing the [[Pandemic Key]]. Pick up several (key respawns every 15 seconds or so), so that if you die or need to return later, you can go right down. | |||
# From the drop room, take either hall leading down (SW or NE). | |||
# Open any one of the four doors with the [[Pandemic Key]] and jump down three times to get to the end area.. | |||
== Maps == | == Maps == | ||
* | * {{ACMaps.com|6548}} | ||
== NPCs == | == NPCs == | ||
| Line 70: | Line 52: | ||
| Cursed Marionette | | Cursed Marionette | ||
| Damned Marionette | | Damned Marionette | ||
| Malignant Marionette | |||
| Yaja the Shepherd | | Yaja the Shepherd | ||
}} | }} | ||
| Line 82: | Line 65: | ||
| Wretched Child | | Wretched Child | ||
}} | }} | ||
== Items and Objects == | == Items and Objects == | ||
* {{ | * {{Itemlink|Abyssal Key}} - see map and directions above. | ||
* {{ | * {{Itemlink|Depraved Key}} - see map and directions above. | ||
* {{ | * {{Itemlink|Pandemic Key}} - see map and directions above. | ||
* {{ | * {{Itemlink|Wretched Key}} - see map and directions above. | ||
* {{ | * {{Itemlink|Fragment of Yaja's Arm}} - dropped by [[Yaja the Shepherd]]. | ||
* {{ | * {{Itemlink|Key to Yaruldi's Hoard}} - dropped by [[Ya'ruldi]]. | ||
* {{ | * {{Itemlink|Yaruldi's Hoard}} - end of the dungeon, see map. | ||
* {{ | * {{Itemlink|Shadow Gem}} - in [[Yaruldi's Hoard]]. | ||
* {{ | * {{Itemlink|Statue of Bael'Zharon, the Hopeslayer}} - . | ||
== Portals == | == Portals == | ||
| Line 101: | Line 83: | ||
Click image for full size version. | Click image for full size version. | ||
<gallery heights=200px widths=200px perrow=3> | <gallery heights=200px widths=200px perrow=3> | ||
File:The Orphanage Live.jpg| | |||
File:The Orphanage 2 Live.jpg|The Orphanage | |||
File:The Orphanage 3 Live.jpg| | |||
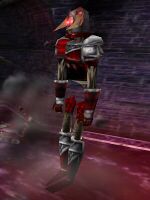
File:Ya'ruldi Live.jpg|Ya'ruldi | File:Ya'ruldi Live.jpg|Ya'ruldi | ||
File:Yaja the Shepherd Live.jpg|Yaja the Shepherd | File:Yaja the Shepherd Live.jpg|Yaja the Shepherd | ||
</gallery> | </gallery> | ||
== Update History == | |||
{{Update History| | |||
[[Pillars Made of Sand]] | |||
* Dungeon added. | |||
}} | |||
Latest revision as of 18:29, 5 July 2017
| Maps NPCs Creatures Items and Objects Portals Images Update History |
| The Orphanage | |
|---|---|
| Quests | Aerbax's Prodigal Shadow, Yaja's Reach Quest |
| Restrictions | Level: 90 Tieable: No Recallable: No Summonable: No |
| Coordinates | Random on Caul |
| Nearest LS | ?? |
| Route | The random portal can spawn anywhere on Singularity Caul. Portal gems can also be obtained as a reward from the Dens of Iniquity high stakes. |
| Map Files: | ACMaps Map |
Show location on Dereth map
| |
| 6548 | |


Notes Edit
Traversing this dungeon is fairly complicated.
- From the drop, use the lever in the middle room of the east wing.
- Southeast of the drop room, take the hallway leading up and pick up the Wretched Key.
- Go back down and northwest of the drop room, take the hallway leading up. Use the Wretched Key to open the door and pick up a Depraved Key.
- Backtrack and return to where you got the first key. Use the Depraved Key to open the door and pick up an Abyssal Key.
- Backtrack to the NW again and use the Abyssal Key to open the room containing the Pandemic Key. Pick up several (key respawns every 15 seconds or so), so that if you die or need to return later, you can go right down.
- From the drop room, take either hall leading down (SW or NE).
- Open any one of the four doors with the Pandemic Key and jump down three times to get to the end area..
Maps Edit
NPCs Edit
- none
Creatures Edit
- Abyssal Child
- Depraved Child
- Forsaken Child
- Pandemic Child
- Shadow Phantom
- Small Shadow Child
- Wretched Child
Items and Objects Edit
- Abyssal Key - see map and directions above.
- Depraved Key - see map and directions above.
- Pandemic Key - see map and directions above.
- Wretched Key - see map and directions above.
- Fragment of Yaja's Arm - dropped by Yaja the Shepherd.
- Key to Yaruldi's Hoard - dropped by Ya'ruldi.
- Yaruldi's Hoard - end of the dungeon, see map.
- Shadow Gem - in Yaruldi's Hoard.
- Statue of Bael'Zharon, the Hopeslayer - .
Portals Edit
Images Edit
Click image for full size version.
-
-
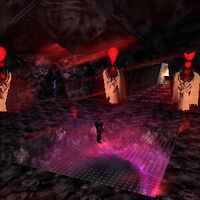
The Orphanage
-

-
Ya'ruldi
-
Yaja the Shepherd


Update History Edit
|