Olthoi Queen Quest: Difference between revisions
CursedAngel (talk | contribs) |
|||
| (17 intermediate revisions by 2 users not shown) | |||
| Line 1: | Line 1: | ||
{{Quest Summary | {{Quest Summary | ||
| | | Level = 70 | ||
| Level 2 = 70 | |||
| | | Recommended Level = | ||
| | | Quest Type = Fellowship | ||
| Starts With = | |||
| Starts At = [[Marescent Plateau]] | |||
| Quest Type = | | Route = [[Timaru]] | ||
| | | Repeat Timer = 20 Hours | ||
| | | Time to Complete = | ||
| | | Contracts = | ||
| | |||
| | |||
| | |||
}} | }} | ||
== | == Overview == | ||
* Part 1 of this walk through can be done ahead of time by someone who has [[ | * Part 1 of this walk through can be done ahead of time by someone who has [[Lockpick]]. '''You will need someone with the skill along for the kill or you cannot reach the Queen normally.''' | ||
* During the Olthoi Swarm on the [[Marescent Plateau]], certain [[Olthoi Brood Noble]]s will drop [[Tesserae]], which can be turned in for a point in the specified skill. | |||
* The rings will remain broken until the queen is killed, so if someone drops bells only to collect Tesserae, you will have to kill the queen to reset the quest. So if you go to the fifth ring and it stays broken for more than a day, it's safe to consider the quest abandoned and you can go in and kill the queen. | |||
== Walkthrough & Notes == | |||
=== Part 1: Crafting Bells === | === Part 1: Crafting Bells === | ||
'''Note:''' One person with [[Lockpick]] is required to complete this part of the quest. | |||
# Obtain 5 of each of the following parts at their respective locations (Lockpick required)| | |||
#* {{Itemlink|Piece of Curved Metal}} - [[East Fork Dam Hive]] - 48.5N, 76.4W - 50+ | |||
# Obtain 5 of each of the following parts at their respective locations (Lockpick required) | #* {{Itemlink|Sheet of Curved Metal}} - [[48.3N, 80.5W - Olthoi Dam Structure]] - 48.8N, 80.6W | ||
#* | #* {{Itemlink|Pyreal Mace}} - [[North Fork Dam Hive]] - 51.4N, 76.0W - 70+ | ||
#* | #* '''Note:''' All three parts are attuned, so you will need [[Lockpick]] to obtain them. The bells can be given once assembled, however. | ||
#* | # Combine the [[Piece of Curved Metal]] with the [[Sheet of Curved Metal]] to create a {{Itemlink|Broken Pyreal Bell}}. | ||
#* '''Note:''' All three parts are attuned, so you will need [[ | # Combine the [[Pyreal Mace]] with the [[Broken Pyreal Bell]] to create a {{Itemlink|Pyreal Bell}}. | ||
# Combine the [[Piece of Curved Metal]] with the [[Sheet of Curved Metal]] to create a | |||
# Combine the [[Pyreal Mace]] with the [[Broken Pyreal Bell]] to create a | |||
# Repeat this process 4 times to create 5 Pyreal Bells. | # Repeat this process 4 times to create 5 Pyreal Bells. | ||
#: ''"The pieces of metal fit togetherThe loop of the pyreal mace attaches to the bell, allowing the item to serve as a clapper. The bell can now be rung!"'' | |||
=== Part 2: Breaking the Rings === | === Part 2: Breaking the Rings (35+) === | ||
{{Warning}} Make sure that the designated killer is '''NOT''' one of the people handing in Bells. | |||
# 5 people must each have 1 [[Pyreal Bell]], and wait at their assigned [[Menhir Ring]]. | # 5 people must each have 1 [[Pyreal Bell]], and wait at their assigned [[Menhir Ring]]. | ||
# Hand a Bell to the Aun Drummer to break the Menhir Ring. | # Hand a Bell to the Aun Drummer to break the Menhir Ring. | ||
# Each ring must be broken in order as follows | # Each ring must be broken in order as follows| | ||
#* '''Ring #1''' - 53.0N, 73.3W | #* '''Ring #1''' - 53.0N, 73.3W | ||
#* '''Ring #2''' - 49.2N, 74.6W | #* '''Ring #2''' - 49.2N, 74.6W | ||
| Line 55: | Line 41: | ||
#* '''Ring #4''' - 44.7N, 80.9W | #* '''Ring #4''' - 44.7N, 80.9W | ||
#* '''Ring #5''' - 50.1N, 80.4W | #* '''Ring #5''' - 50.1N, 80.4W | ||
# It will take | # It will take a few minutes after dropping a Bell before the next drummer spawns (15 minutes). | ||
# One toon can only drop one (1) bell every 3 weeks. If you try within the 3 weeks, you will obtain the title "Stonebreaker". In addition, any character that drops a bell will not have access to [[Timaru]] for 3 weeks. | # One toon can only drop one (1) bell every 3 weeks. If you try within the 3 weeks, you will obtain the title "Stonebreaker". In addition, any character that drops a bell will not have access to [[Timaru]] for 3 weeks. | ||
#: {{optional}} At this point olthoi will begin swarming on the plateau. This event lasts from the time the last bell is dropped until either the Queen dies or all teserra bearing [[Olthoi Brood Noble]]s have died in all five regions. See [[Tesserae]] for details, it can take hours to advance the swarms to the tessera dropping stage so if you just want the queen, skip this. | |||
=== Part 3: Mount Elyrii Hive (Getting Sprayed) === | === Part 3: Mount Elyrii Hive (Getting Sprayed) (70+) === | ||
# Go to [[Mount Elyrii Hive]] at 48.5N, 81.7W | # Go to [[Mount Elyrii Hive]] at 48.5N, 81.7W | ||
# One party should trigger floor plates to open doors, the others take the NW ramp down and wait at first door. | # One party should trigger floor plates to open doors, the others take the NW ramp down and wait at first door. | ||
| Line 73: | Line 60: | ||
=== Part 4: Royal Hive === | === Part 4: Royal Hive === | ||
{{Warning}} You will need a Lockpicker to get through this dungeon normally. If one is not present, you must get one quickly. | |||
# The whole group runs up the hill to the center of the room. Leave at least one person at the top to hit the floor plates for the group. | # The whole group runs up the hill to the center of the room. Leave at least one person at the top to hit the floor plates for the group. | ||
# The main group heads down the ramp in the floor and turns left at the T to reach the locked door. Have the Lockpicker open the door and proceed past it. '''Leave one person here to open the door for the one(s) hitting the floor plates.''' | # The main group heads down the ramp in the floor and turns left at the T to reach the locked door. Have the Lockpicker open the door and proceed past it. '''Leave one person here to open the door for the one(s) hitting the floor plates.''' | ||
| Line 83: | Line 70: | ||
# Have the higher level/stronger characters jump down first to clear the room. '''DO NOT attack the Queen yet.''' When clear, have everyone that has not yet jumped join the group in the southeast corner of the room. Designate 2 people to pin the Queen or simply form a wall to block her from the group. Also be sure you have your designated killer established. | # Have the higher level/stronger characters jump down first to clear the room. '''DO NOT attack the Queen yet.''' When clear, have everyone that has not yet jumped join the group in the southeast corner of the room. Designate 2 people to pin the Queen or simply form a wall to block her from the group. Also be sure you have your designated killer established. | ||
# Once the wall/pinning team is assembled, have 1 person shoot the Queen until she dies. It does not matter who. | # Once the wall/pinning team is assembled, have 1 person shoot the Queen until she dies. It does not matter who. | ||
# The 'real' Queen will spawn now. After full debuffs, have '''''only''''' the designated killer attack until she reaches 45% or less, then have the rest of the non-wall team attack. | # The 'real' Queen will spawn now. After full debuffs, have '''''only''''' the designated killer attack until she reaches 45% or less, then have the rest of the non-wall team attack. Once the queen is killed, a global message will broadcast on the server. | ||
# Make sure that '''''ONLY THE KILLER''''' loots the | #: ''"In the darkest depths of Marescent Plateau on far Marae Lassel, the party of the bold <Insert Player> has slain the young queen of the island's Olthoi brood! As one, the Olthoi swarms recoil from her final burst of terror, and slowly begin to withdraw back into their hives."'' | ||
# Hand the Head to Aun Hareltah for 40 million XP and the | # Make sure that '''''ONLY THE KILLER''''' loots the {{Itemlink|The Queen's Head}}. Nobody else will get credit for turning it in. Decide who will get {{Itemlink|Olthoi Carapace}}s and Eggs as you wish, then head back to [[Timaru]]. | ||
# Hand the Head to Aun Hareltah for 40 million XP and the {{Itemlink|Queenslayer Title Token}}, which can be handed back for the Queenslayer title. The Eggs can be used in cooking, and the Carapace is handed to the [[Olthoi Hunter]] for an {{Itemlink|Olthoi Cuirass}}. | |||
#* ''Note:'' If the killer handed in a bell in the pre-quest section, the Head cannot be handed in for credit. | #* ''Note:'' If the killer handed in a bell in the pre-quest section, the Head cannot be handed in for credit. | ||
== Maps == | == Dungeons & Maps == | ||
{{Dungeon Table | {{Dungeon Table | ||
| Table Rows = | | Table Rows = | ||
{{Dungeon Maps | {{Dungeon Maps | ||
| Dungeon = East Fork Dam Hive | | Dungeon = East Fork Dam Hive | ||
| Coordinates = | | Coordinates = 48.5N, 76.4W | ||
| Wiki Map File = | | Wiki Map File = | ||
| ACmaps ID = 027F | | ACmaps ID = 027F | ||
}} | }} | ||
{{Dungeon Maps | {{Dungeon Maps | ||
| Dungeon = North Fork Dam Hive | | Dungeon = North Fork Dam Hive | ||
| Coordinates = | | Coordinates = 51.4N, 76.0W | ||
| Wiki Map File = | | Wiki Map File = | ||
| ACmaps ID = 03A6 | | ACmaps ID = 03A6 | ||
}} | }} | ||
{{Dungeon Maps | {{Dungeon Maps | ||
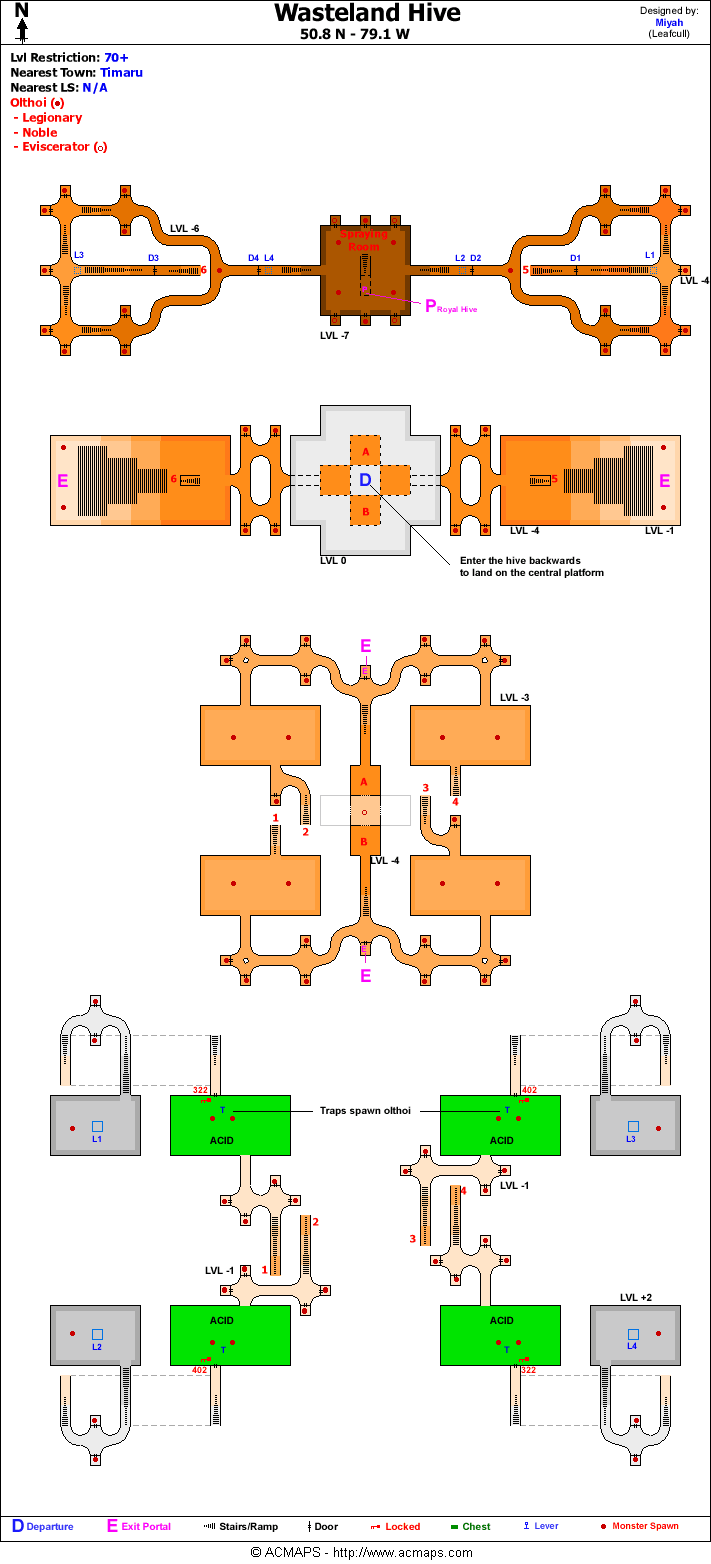
| Dungeon = Wasteland Hive | | Dungeon = Wasteland Hive | ||
| Coordinates = | | Coordinates = 50.8N, 79.1W | ||
| Wiki Map File = | | Wiki Map File = | ||
| ACmaps ID = 0285 | | ACmaps ID = 0285 | ||
}} | }} | ||
{{Dungeon Maps | {{Dungeon Maps | ||
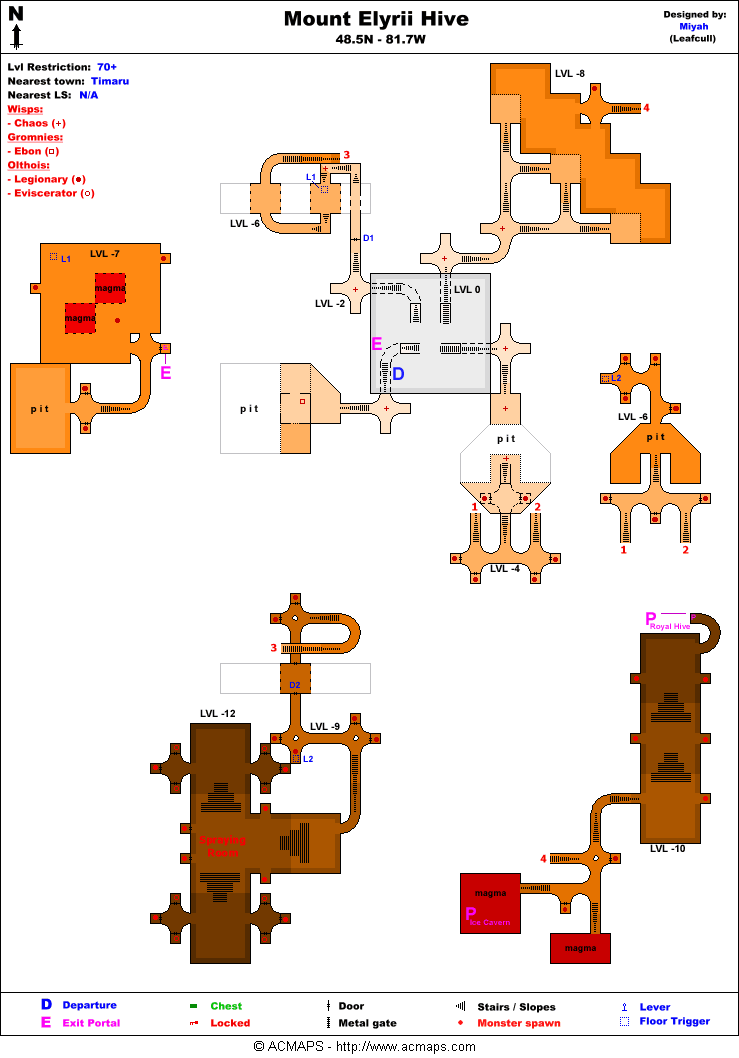
| Dungeon = Mount Elyrii Hive | | Dungeon = Mount Elyrii Hive | ||
| Coordinates = | | Coordinates = 48.5N, 81.7W | ||
| Wiki Map File = | | Wiki Map File = | ||
| ACmaps ID = 03A7 | | ACmaps ID = 03A7 | ||
}} | }} | ||
{{Dungeon Maps | {{Dungeon Maps | ||
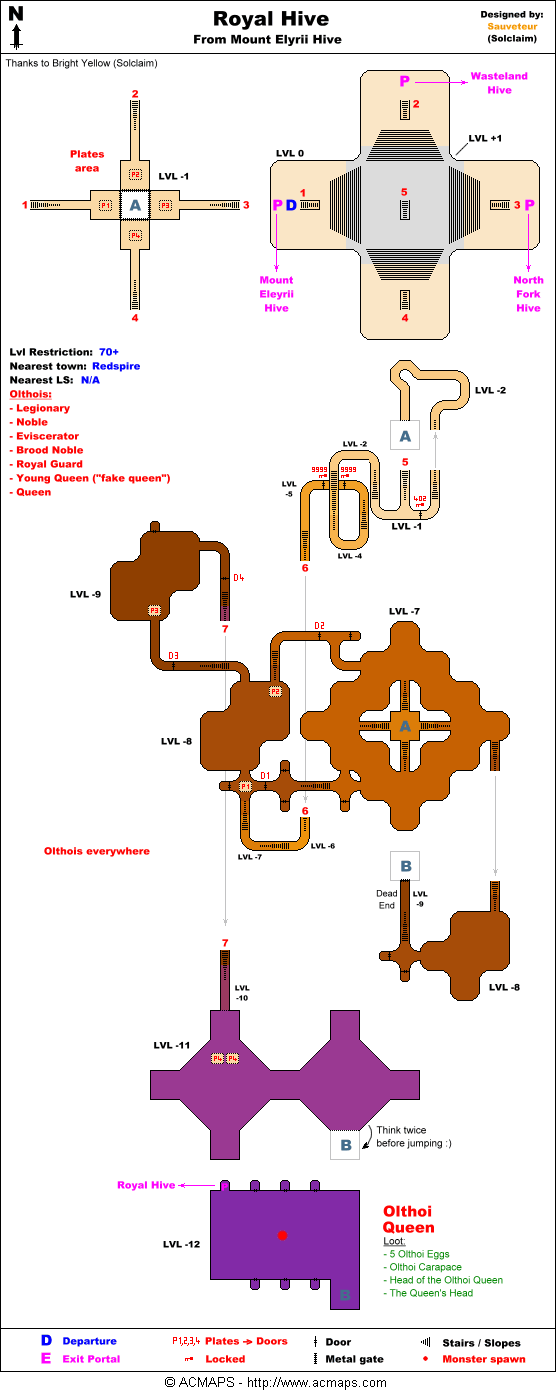
| Dungeon = Royal Hive | | Dungeon = Royal Hive | ||
| Coordinates = | | Coordinates = From [[Mount Elyrii Hive]] | ||
| Wiki Map File = | | Wiki Map File = | ||
| ACmaps ID = 0288 | | ACmaps ID = 0288 | ||
}} | }} | ||
}} | }} | ||
== | == Rewards == | ||
{{ | {{Rewards Table | ||
| | | Quest Task = Hand in the [[The Queen's Head]] (must be the Olthoi Queen slayer) | ||
{{ | | Item Reward = | ||
| Title = Queenslayer | * {{Itemlink|Head of the Olthoi Queen|Mode=icon}} | ||
| | | Max XP Reward = 40,000,000 | Percent of Level = Fixed | Level Cap = | ||
| Repeat Max XP Reward = | Repeat Percent of Level = | Repeat Level Cap = | |||
| Luminance Reward = | |||
| Title Reward = Queenslayer | |||
| Other Reward = | |||
}} | }} | ||
{{ | {{Rewards Table | ||
| Quest Task = Hand in the [[Olthoi Carapace]] | |||
| | | Item Reward = | ||
* {{Itemlink|Olthoi Cuirass|Mode=icon}} | |||
| Max XP Reward = 30,000,000 | Percent of Level = Fixed | Level Cap = | |||
| Repeat Max XP Reward = | Repeat Percent of Level = | Repeat Level Cap = | |||
| Luminance Reward = | |||
| Title Reward = | |||
| Other Reward = | |||
}} | }} | ||
{{Rewards Table | |||
| Quest Task = Hand in 2 or more [[Pyreal Bell]]s | |||
| Item Reward = | |||
| Max XP Reward = | Percent of Level = | Level Cap = | |||
| Repeat Max XP Reward = | Repeat Percent of Level = | Repeat Level Cap = | |||
| Luminance Reward = | |||
| Title Reward = Stonebreaker | |||
| Other Reward = | |||
}} | }} | ||
== Images == | == Images == | ||
<gallery widths=200px heights=200px perrow=3> | <gallery widths=200px heights=200px perrow=3> | ||
File:48.3N, 80.5W - Olthoi Dam Structure Live.jpg|West Dam Structure with one the bell part chests. | |||
File:Royal Hive Olthoi Eggs Live.jpg|Eggs (decoration). | |||
File:Olthoi Queen (Egg Bearing) Live.jpg|The Olthoi Queen | |||
</gallery> | </gallery> | ||
== | == Dialog == | ||
{{Dialog| | |||
;Handing in Pyreal Bell | |||
|You give Aun Kahmaula Pyreal Bell | |||
|Aun Kahmaula tells you, "How interesting. This is an instrument used by your people? Tonk says 'music is all and everlasting' | |||
|The crashing of the great pyreal bell reverberates through the ground. The menhir stones crack and break! | |||
|Aun Kahmaula tells you, "No! What have you done? Villian! | |||
|Aun Kahmaula tells you, "I must go and warn the xuta. | |||
;Handing in Pyreal Bell before Repeat Timer expires (Stonebreaker Title) | |||
< | | You give Aun Gehaua Pyreal Bell | ||
|Aun Gehaua tells you, "How foolish do you think us, <Player Name>? We know your evil name, yes, we do. You have done your damage to our efforts just recently! | |||
|"Begone, and take your hideous bell with you. Even if you return in three weeks, it shall be too soon for me. | |||
|Aun Gehaua gives you Pyreal Bell | |||
}} | |||
=== | == Update History == | ||
{{Update History| | |||
[[Dark Majesty (expansion)]] | |||
* Quest introduced. | |||
[[That Which Is Ours]] | |||
* [[Queenslayer Title Token]] added. | |||
[[Filling in the Blanks]] | |||
* XP reward for Olthoi Carapace increased from 100,000 to 30,000,000 (flat) | |||
* Quest mechanics changed so a player who picks up the head cannot also pick up the carapace. | |||
[[The Quest for Freedom]] | |||
* Repeat timer changed from 27 days to 20 hours. | |||
* | }} | ||
Latest revision as of 23:19, 12 July 2024
| Walkthrough & Notes Dungeons & Maps Rewards Images Dialog Update History |
| Olthoi Queen Quest | |
|---|---|
| Level: | 70 |
| Type: | Fellowship |
| Starts At: | Marescent Plateau |
| Route: | Timaru |
| Repeat: | 20 Hours |
Overview Edit
- Part 1 of this walk through can be done ahead of time by someone who has Lockpick. You will need someone with the skill along for the kill or you cannot reach the Queen normally.
- During the Olthoi Swarm on the Marescent Plateau, certain Olthoi Brood Nobles will drop Tesserae, which can be turned in for a point in the specified skill.
- The rings will remain broken until the queen is killed, so if someone drops bells only to collect Tesserae, you will have to kill the queen to reset the quest. So if you go to the fifth ring and it stays broken for more than a day, it's safe to consider the quest abandoned and you can go in and kill the queen.
Walkthrough & Notes Edit
Part 1: Crafting Bells Edit
Note: One person with Lockpick is required to complete this part of the quest.
- Obtain 5 of each of the following parts at their respective locations (Lockpick required)|
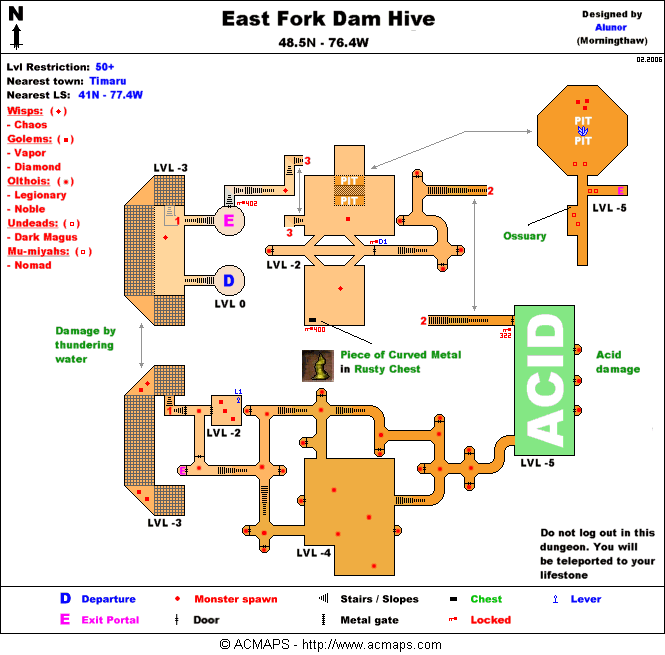
- Piece of Curved Metal - East Fork Dam Hive - 48.5N, 76.4W - 50+
- Sheet of Curved Metal - 48.3N, 80.5W - Olthoi Dam Structure - 48.8N, 80.6W
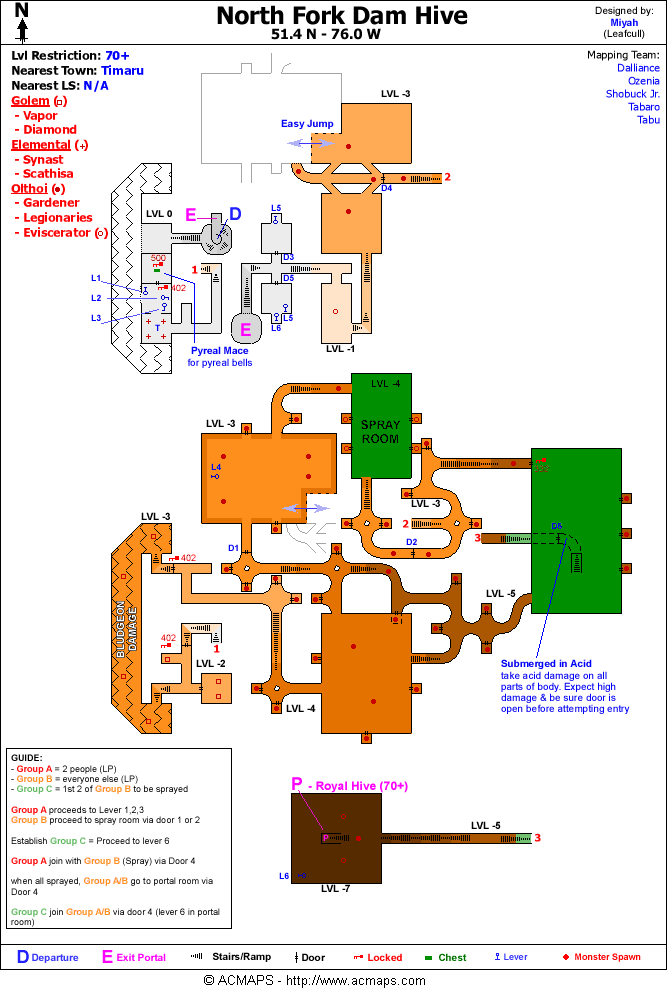
- Pyreal Mace - North Fork Dam Hive - 51.4N, 76.0W - 70+
- Note: All three parts are attuned, so you will need Lockpick to obtain them. The bells can be given once assembled, however.
- Combine the Piece of Curved Metal with the Sheet of Curved Metal to create a Broken Pyreal Bell.
- Combine the Pyreal Mace with the Broken Pyreal Bell to create a Pyreal Bell.
- Repeat this process 4 times to create 5 Pyreal Bells.
- "The pieces of metal fit togetherThe loop of the pyreal mace attaches to the bell, allowing the item to serve as a clapper. The bell can now be rung!"
Part 2: Breaking the Rings (35+) Edit
Warning: Make sure that the designated killer is NOT one of the people handing in Bells.
- 5 people must each have 1 Pyreal Bell, and wait at their assigned Menhir Ring.
- Hand a Bell to the Aun Drummer to break the Menhir Ring.
- Each ring must be broken in order as follows|
- Ring #1 - 53.0N, 73.3W
- Ring #2 - 49.2N, 74.6W
- Ring #3 - 46.5N, 75.8W
- Ring #4 - 44.7N, 80.9W
- Ring #5 - 50.1N, 80.4W
- It will take a few minutes after dropping a Bell before the next drummer spawns (15 minutes).
- One toon can only drop one (1) bell every 3 weeks. If you try within the 3 weeks, you will obtain the title "Stonebreaker". In addition, any character that drops a bell will not have access to Timaru for 3 weeks.
- Optional: At this point olthoi will begin swarming on the plateau. This event lasts from the time the last bell is dropped until either the Queen dies or all teserra bearing Olthoi Brood Nobles have died in all five regions. See Tesserae for details, it can take hours to advance the swarms to the tessera dropping stage so if you just want the queen, skip this.
Part 3: Mount Elyrii Hive (Getting Sprayed) (70+) Edit
- Go to Mount Elyrii Hive at 48.5N, 81.7W
- One party should trigger floor plates to open doors, the others take the NW ramp down and wait at first door.
- The trigger team takes the SW ramp down and follows a short hallway. Jump down a pit, then run past the exit portal into a large room. The trigger plate is in the far NW corner of this room.
- The trigger team takes exit portal and re-enters dungeon.
- The main party goes in, and at least one persons either bugs the door, or waits at the trigger plate a bit further down. The rest of the main party moves further down to the second lever door.
- The trigger team takes, from drop, the SE ramp down, then jumps down into the pit. The trigger plate is at the end of the hallway to the N. Backtrack, take the ramp and follow the corridor until you reach the pit from the other side. A small running jump should get you back.
- One person bugs the second door until the trigger team and the bugger of the first door have gone through.
- Shortly after the second door, a large room with two ramps down to the S and the N can be seen.
- Everyone should kill Olthoi Eviscerators until they get the message of being sprayed, then not kill any more.
- The spraying flags you for 1.5 hours to enter the Royal Hive
- Once everyone is sprayed, have the whole group run back to the beginning (past both floor plate doors; the plate to re-open the first door you come to is in the alcove south of the door). At the start, take the NE ramp down. Jump into the pit and continually head NE to reach the Royal Hive portal.
- Anyone not sprayed will be unable to enter.
Part 4: Royal Hive Edit
Warning: You will need a Lockpicker to get through this dungeon normally. If one is not present, you must get one quickly.
- The whole group runs up the hill to the center of the room. Leave at least one person at the top to hit the floor plates for the group.
- The main group heads down the ramp in the floor and turns left at the T to reach the locked door. Have the Lockpicker open the door and proceed past it. Leave one person here to open the door for the one(s) hitting the floor plates.
- The lever person/team heads back down each direction from the top of the hill to the ramps in the floor. There is a floor plate in the middle of the room at the bottom of each ramp.
- Once all 4 (North/East/South/West) are hit, head back to the top of the main room and follow the directions of the other group.
- Jump down the pit and head either northwest or southwest to reach an unopenable door. When it opens, run past and into the room to the north/west. Wait at the next door to the northwest of that room until it opens.
- Run past the door (once it opens) into another room and into the east hallway to the final door. Once it opens, run just past it and wait for the lever hitter(s). One person may need to run back and hit the floor plates to open the doors that would have closed behind the group; they are at the hallway openings leading to the respective door.
- Once the group is together, head southeast to the final pit. Wait to jump. Perform a final body and buff check here.
- Have the higher level/stronger characters jump down first to clear the room. DO NOT attack the Queen yet. When clear, have everyone that has not yet jumped join the group in the southeast corner of the room. Designate 2 people to pin the Queen or simply form a wall to block her from the group. Also be sure you have your designated killer established.
- Once the wall/pinning team is assembled, have 1 person shoot the Queen until she dies. It does not matter who.
- The 'real' Queen will spawn now. After full debuffs, have only the designated killer attack until she reaches 45% or less, then have the rest of the non-wall team attack. Once the queen is killed, a global message will broadcast on the server.
- "In the darkest depths of Marescent Plateau on far Marae Lassel, the party of the bold <Insert Player> has slain the young queen of the island's Olthoi brood! As one, the Olthoi swarms recoil from her final burst of terror, and slowly begin to withdraw back into their hives."
- Make sure that ONLY THE KILLER loots the The Queen's Head. Nobody else will get credit for turning it in. Decide who will get Olthoi Carapaces and Eggs as you wish, then head back to Timaru.
- Hand the Head to Aun Hareltah for 40 million XP and the Queenslayer Title Token, which can be handed back for the Queenslayer title. The Eggs can be used in cooking, and the Carapace is handed to the Olthoi Hunter for an Olthoi Cuirass.
- Note: If the killer handed in a bell in the pre-quest section, the Head cannot be handed in for credit.
Dungeons & Maps Edit
| Dungeon | Coordinates | Wiki Map | ACmaps |
|---|---|---|---|
| East Fork Dam Hive | 48.5N, 76.4W | -- | 027F |
| North Fork Dam Hive | 51.4N, 76.0W | -- | 03A6 |
| Wasteland Hive | 50.8N, 79.1W | -- | 0285 |
| Mount Elyrii Hive | 48.5N, 81.7W | -- | 03A7 |
| Royal Hive | From Mount Elyrii Hive | -- | 0288 |
Rewards Edit
| Hand in the The Queen's Head (must be the Olthoi Queen slayer) | |
|---|---|
| Experience: | 40,000,000 (Fixed) |
| Titles: | Queenslayer |
| Items: | |
| Hand in the Olthoi Carapace | |
|---|---|
| Experience: | 30,000,000 (Fixed) |
| Items: | |
| Hand in 2 or more Pyreal Bells | |
|---|---|
| Titles: | Stonebreaker |
Images Edit
-

West Dam Structure with one the bell part chests.
-
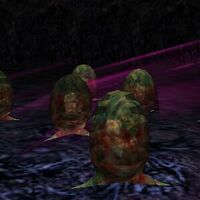
Eggs (decoration).
-
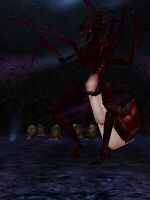
The Olthoi Queen


_Live.jpg)
Dialog Edit
- Handing in Pyreal Bell
- You give Aun Kahmaula Pyreal Bell
- Aun Kahmaula tells you, "How interesting. This is an instrument used by your people? Tonk says 'music is all and everlasting'
- The crashing of the great pyreal bell reverberates through the ground. The menhir stones crack and break!
- Aun Kahmaula tells you, "No! What have you done? Villian!
- Aun Kahmaula tells you, "I must go and warn the xuta.
- Handing in Pyreal Bell before Repeat Timer expires (Stonebreaker Title)
- You give Aun Gehaua Pyreal Bell
- Aun Gehaua tells you, "How foolish do you think us, <Player Name>? We know your evil name, yes, we do. You have done your damage to our efforts just recently!
- "Begone, and take your hideous bell with you. Even if you return in three weeks, it shall be too soon for me.
- Aun Gehaua gives you Pyreal Bell
Update History Edit
|