Prismatic Shadow Armor: Difference between revisions
No edit summary |
No edit summary |
||
| (11 intermediate revisions by the same user not shown) | |||
| Line 1: | Line 1: | ||
{{Custom}} | {{Custom}} | ||
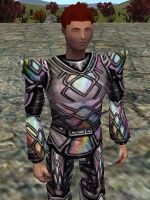
[[File:Prismatic Shadow Armor Live.jpg|thumb]] | [[File:Prismatic Shadow Armor Live.jpg|thumb|alt=Current Prismatic Shadow Armor|Current Prismatic Shadow Armor]] | ||
Crafting the [[Prismatic Shadow Armor]] is a series of quests and collections that will have you adventuring all over Dereth to complete. The parts as they are divided below can be | Crafting the [[Prismatic Shadow Armor]] is a series of quests and collections that will have you adventuring all over Dereth to complete. The parts as they are divided below can be collected in any order. | ||
'''Sundering Custom:''' [[Retired Shadow Armor]] has returned to Dereth with the Echo's of the [[Shadow Armor#Master Armorers|Master Armorers]], these Retired versions can be made Prismatic as well. | '''Sundering Custom:''' [[Retired Shadow Armor]] has returned to Dereth with the Echo's of the [[Shadow Armor#Master Armorers|Master Armorers]], these Retired versions, which we'll call "Classic" can be made Prismatic as well. | ||
== Craft the Shadow Armor ( | Note: Classic Prismatic Koujia does not currently exist in-game, nor does any of the Alduressa Shadow Armor. | ||
Choose a version of the [[Retired Shadow Armor]] or [[Shadow Armor#Base Shadow Armor Sets|Shadow Armor]]. However, the final piece used to make the [[Prismatic Shadow Armor]] can be re-used on as many different sets of armor as you'd like. | |||
== Craft the Shadow Armor (Classic or Current) == | |||
Choose a version of the [[Retired Shadow Armor|Classic Shadow Armor]] or [[Shadow Armor#Base Shadow Armor Sets|Shadow Armor]]. However, the final piece ([[Prismatic Glyph]]) used to make the [[Prismatic Shadow Armor]] can be re-used on as many different sets of armor as you'd like. | |||
=== Collect Scintillating Gems === | === Collect Scintillating Gems === | ||
| Line 13: | Line 15: | ||
| rowspan="2" |[[File:Scintillating Gem Icon.png|center|thumb]] | | rowspan="2" |[[File:Scintillating Gem Icon.png|center|thumb]] | ||
|- | |- | ||
|[[Retired Shadow Armor]] - Requires 2 [[Shadow Armor#Crystal Trophies|Scintillating Gems]] | |[[Retired Shadow Armor|Classic Shadow Armor]] - Requires 2 [[Shadow Armor#Crystal Trophies|Scintillating Gems]] | ||
|} | |} | ||
| Line 20: | Line 22: | ||
* All 3 of these Shadow Armor sets will generate the same [[Prismatic Shadow Armor]]. | * All 3 of these Shadow Armor sets will generate the same [[Prismatic Shadow Armor]]. | ||
=== | === Classic Shadow Armor === | ||
* Obtain your preferred style of [[Retired Shadow Armor#Neo|Neo - Retired Shadow Armor]] by handing both [[Scintillating Gem|Scintillating Gems]] to the Echo of the [[Master Armorers]]. You will get your bottom half of armor for your 1st gem, then your upper half for your 2nd. | * Obtain your preferred style of [[Retired Shadow Armor#Neo|Neo - Retired Shadow Armor]] by handing both [[Scintillating Gem|Scintillating Gems]] to the Echo of the [[Master Armorers]]. You will get your bottom half of armor for your 1st gem, then your upper half for your 2nd. | ||
| Line 31: | Line 33: | ||
=== Obtain any Major Atlan Stone === | === Obtain any Major Atlan Stone === | ||
Which [[Major Atlan Stones|Major Atlan Stone]] you choose will have no affect on the final [[Prismatic Shadow Armor]]. | Which [[Major Atlan Stones|Major Atlan Stone]] you choose will have no affect on the final [[Prismatic Shadow Armor]]. | ||
{| class="wikitable | {| class="wikitable" | ||
|[[File:Major Stinging Stone Icon.png|center|thumb]] | |[[File:Major Stinging Stone Icon.png|center|thumb]] | ||
|[[File:Major Smoldering Stone Icon.png|center|thumb]] | |[[File:Major Smoldering Stone Icon.png|center|thumb]] | ||
| Line 43: | Line 45: | ||
|} | |} | ||
Apply the [[Major Atlan Stones|Major Atlan Stone]] to each piece of Shadow Armor to upgrade it to [[Major Shadow Armor]]. | Apply the [[Major Atlan Stones|Major Atlan Stone]] to each piece of Shadow Armor to upgrade it to [[Major Shadow Armor]]. | ||
[[File:Black Fire Atlan Stone Icon.png|thumb]] | |||
== Black Fire Atlan Stone - Upgrade to Blackfire Shadow Armor == | == Black Fire Atlan Stone - Upgrade to Blackfire Shadow Armor == | ||
Note: If you are only building the [[Retired Shadow Armor]], you can skip this part. | Note: If you are only building the [[Retired Shadow Armor|Classic Shadow Armor]], you can skip this part. | ||
# Begin the [[Lady Aerfalle Quest]]. | # Begin the [[Lady Aerfalle Quest]]. | ||
| Line 52: | Line 55: | ||
Apply the [[Black Fire Atlan Stone]] to each piece of [[Major Shadow Armor]] to upgrade it to [[Blackfire Shadow Armor]]. | Apply the [[Black Fire Atlan Stone]] to each piece of [[Major Shadow Armor]] to upgrade it to [[Blackfire Shadow Armor]]. | ||
[[File:Enhanced Black Fire Atlan Stone Icon.png|thumb]] | |||
== Enhanced Black Fire Atlan Stone - Upgrade to Enhanced Shadow Armor == | == Enhanced Black Fire Atlan Stone - Upgrade to Enhanced Shadow Armor == | ||
Note: If you are only building the [[Retired Shadow Armor]], you can skip this part. | Note: If you are only building the [[Retired Shadow Armor|Classic Shadow Armor]], you can skip this part. | ||
# Complete the [[Lady Aerfalle Quest#Uber Version|Uber Lady Aerfalle Quest]]. | # Complete the [[Lady Aerfalle Quest#Uber Version|Uber Lady Aerfalle Quest]]. | ||
| Line 61: | Line 65: | ||
Apply the [[Enhanced Black Fire Atlan Stone]] to each piece of [[Blackfire Shadow Armor]] to upgrade it to [[Enhanced Shadow Armor]]. | Apply the [[Enhanced Black Fire Atlan Stone]] to each piece of [[Blackfire Shadow Armor]] to upgrade it to [[Enhanced Shadow Armor]]. | ||
[[File:Prismatic Glyph Icon.png|thumb]] | |||
== Prismatic Glyph == | == Prismatic Glyph == | ||
Follow the steps laid out in the [[Essence Recovery|Essence Recovery Quest]] to build your [[Prismatic Glyph]]. The glyph is attuned, however it can be used an unlimited number of times to create the pieces of [[Prismatic Shadow Armor]], which are not attuned. | |||
* Apply to undyed [[Retired Shadow Armor#Neo|Neo - Retired Shadow Armor]] to create pieces of Classic Prismatic Shadow Armor. | |||
* Apply to [[Enhanced Shadow Armor]] to create pieces of Current [[Prismatic Shadow Armor]]. | |||
== Images == | |||
Click image for full size version. | |||
<gallery widths="200" heights="200" perrow="4"> | |||
File:Prismatic Shadow Amuli Live.jpg|Classic Prismatic Amuli | |||
File:Prismatic Shadow Celdon Live.jpg|Classic Prismatic Celdon | |||
</gallery> | |||
Latest revision as of 15:30, 22 March 2025
| Custom Content This page is for custom content on Sundering. |

Crafting the Prismatic Shadow Armor is a series of quests and collections that will have you adventuring all over Dereth to complete. The parts as they are divided below can be collected in any order.
Sundering Custom: Retired Shadow Armor has returned to Dereth with the Echo's of the Master Armorers, these Retired versions, which we'll call "Classic" can be made Prismatic as well.
Note: Classic Prismatic Koujia does not currently exist in-game, nor does any of the Alduressa Shadow Armor.
Craft the Shadow Armor (Classic or Current) Edit
Choose a version of the Classic Shadow Armor or Shadow Armor. However, the final piece (Prismatic Glyph) used to make the Prismatic Shadow Armor can be re-used on as many different sets of armor as you'd like.
Collect Scintillating Gems Edit
| Current Shadow Armor - Requires 9 Scintillating Gems | |
| Classic Shadow Armor - Requires 2 Scintillating Gems |
Current Shadow Armor Edit
- All 3 of these Shadow Armor sets will generate the same Prismatic Shadow Armor.
Classic Shadow Armor Edit
- Obtain your preferred style of Neo - Retired Shadow Armor by handing both Scintillating Gems to the Echo of the Master Armorers. You will get your bottom half of armor for your 1st gem, then your upper half for your 2nd.
- The first version given by the Echo will be the Neo version, and the version that will accept the Prismatic Glyph.
- Do not apply any Shadow Dye to the armor, this will make it unable to become Prismatic.
Major Atlan Stone - Upgrade to Major Shadow Armor Edit
Note: If you are only building the Retired Shadow Armor, you can skip this part.
Obtain any Major Atlan Stone Edit
Which Major Atlan Stone you choose will have no affect on the final Prismatic Shadow Armor.
| Major Stinging Stone | Major Smoldering Stone | Major Shivering Stone | Major Sparking Stone |
Apply the Major Atlan Stone to each piece of Shadow Armor to upgrade it to Major Shadow Armor.
Black Fire Atlan Stone - Upgrade to Blackfire Shadow Armor Edit
Note: If you are only building the Classic Shadow Armor, you can skip this part.
- Begin the Lady Aerfalle Quest.
- While in the Aerlinthe volcano (Tenkarrdun), kill the Behemoth of Tenkarrdun and loot the Black Boulder before killing the Relic Watchman.
- Bring the Black Boulder to a Stone Collector to be given the Black Fire Atlan Stone.
Apply the Black Fire Atlan Stone to each piece of Major Shadow Armor to upgrade it to Blackfire Shadow Armor.
Enhanced Black Fire Atlan Stone - Upgrade to Enhanced Shadow Armor Edit
Note: If you are only building the Classic Shadow Armor, you can skip this part.
- Complete the Uber Lady Aerfalle Quest.
- After defeating Uber Lady Aerfalle, loot the Embossed Ashen Key to open Lady of Aerlinthe's Embossed Chest.
- Retrieve the Enhanced Black Fire Atlan Stone from the chest.
Apply the Enhanced Black Fire Atlan Stone to each piece of Blackfire Shadow Armor to upgrade it to Enhanced Shadow Armor.
Prismatic Glyph Edit
Follow the steps laid out in the Essence Recovery Quest to build your Prismatic Glyph. The glyph is attuned, however it can be used an unlimited number of times to create the pieces of Prismatic Shadow Armor, which are not attuned.
- Apply to undyed Neo - Retired Shadow Armor to create pieces of Classic Prismatic Shadow Armor.
- Apply to Enhanced Shadow Armor to create pieces of Current Prismatic Shadow Armor.
Images Edit
Click image for full size version.
-

Classic Prismatic Amuli
-
Classic Prismatic Celdon

