Shadow Captain's Heaume Quest: Difference between revisions
>Arkalor's Bot m (Text replace - "{{Quest Summary Temp" to "{{Quest Summary") |
No edit summary |
||
| (2 intermediate revisions by the same user not shown) | |||
| Line 1: | Line 1: | ||
{{Quest Summary | {{Quest Summary | ||
| | | nocat = true | ||
| | | Level = 26, 31 | ||
| Recommended Level = | | Recommended Level = | ||
| Quest Type = | | Quest Type = Multi-Fellowship | ||
| Starts With = [[Chosen of Asheron]] | | Starts With = {{Optional}} [[Chosen of Asheron]] | ||
| Starts At = [[Cragstone]] / [[Hebian-To]] / [[Zaikhal]] | | Starts At = [[Cragstone]] / [[Hebian-To]] / [[Zaikhal]] | ||
| Repeat Timer = 20 Hours | | Repeat Timer = 20 Hours | ||
| Line 31: | Line 31: | ||
# '''Team 1:''' Continue to move through the hallway until you get to a small 4-room offshoot, each of which contains a lever. Use the southwest most lever to open the final door for Team 2. | # '''Team 1:''' Continue to move through the hallway until you get to a small 4-room offshoot, each of which contains a lever. Use the southwest most lever to open the final door for Team 2. | ||
# '''Team 2:''' Once through the door, take your first left at the bottom of the ramp and use the lever to open the next gate for Team 1. | # '''Team 2:''' Once through the door, take your first left at the bottom of the ramp and use the lever to open the next gate for Team 1. | ||
# '''Team 1:''' Once through the gate, continue until you reach the final room, where you'll the final lever on the North wall (under the statue). Flip the lever for Team 2, then kill the [[Upper Shadow Heart Leader]] and loot the {{ | # '''Team 1:''' Once through the gate, continue until you reach the final room, where you'll the final lever on the North wall (under the statue). Flip the lever for Team 2, then kill the [[Upper Shadow Heart Leader]] and loot the {{Itemlink|Shadow Captain's Heaume}} from his corpse (drops 1 per kill). | ||
# '''Team 2:''' Head through the last door, run down the ramp, and kill the [[Lower Shadow Heart Leader]]. Loot the {{ | # '''Team 2:''' Head through the last door, run down the ramp, and kill the [[Lower Shadow Heart Leader]]. Loot the {{Itemlink|Heart of Shadow}} from the ground nearby. | ||
Notes | Notes | ||
* If you visit the optional quest starter, [[Chosen of Asheron]], he will hand you the texts: {{ | * If you visit the optional quest starter, [[Chosen of Asheron]], he will hand you the texts: {{Itemlink|Asheron's Second Missive}} and {{Itemlink|Instructions (Sepulcher of the Hopeslayer)|Instructions}}. | ||
== Dungeons & Maps == | == Dungeons & Maps == | ||
| Line 67: | Line 67: | ||
== Rewards == | == Rewards == | ||
{{Rewards Table | |||
{{ | | Quest Task = Lower Team | ||
| Heart of Shadow | | Item Reward = | ||
* {{Itemlink|Heart of Shadow|Mode=icon}} | |||
| Max XP Reward = | Percent of Level = | Level Cap = | |||
| Repeat Max XP Reward = | Repeat Percent of Level = | Repeat Level Cap = | |||
| Luminance Reward = | |||
| Title Reward = | |||
| Other Reward = | |||
}} | }} | ||
{{ | {{Rewards Table | ||
| Shadow Captain's Heaume | | Quest Task = Upper Team | ||
| Item Reward = | |||
* {{Itemlink|Shadow Captain's Heaume|Mode=icon}} | |||
| Max XP Reward = | Percent of Level = | Level Cap = | |||
| Repeat Max XP Reward = | Repeat Percent of Level = | Repeat Level Cap = | |||
| Luminance Reward = | |||
| Title Reward = | |||
| Other Reward = | |||
}} | }} | ||
| Line 84: | Line 97: | ||
== Dialog == | == Dialog == | ||
{{Dialog| | |||
;Opening Dialog | |||
|Chosen of Asheron tells you, "My lord conveys his gratitude for the efforts of your people. If you are one of the champions who took part in the defeat of Bael'Zharon, I can take your Soul Crystal Gem and give you a spellcasting staff to commemorate your achievement. | |||
|Chosen of Asheron gives you Asheron's Second Missive | |||
|Chosen of Asheron tells you, "Also, I have instructions here that will lead you to the site of the Hopeslayer's defeat, should you wish to visit it. | |||
|Chosen of Asheron gives you Instructions. | |||
}} | |||
== Update History == | == Update History == | ||
| Line 104: | Line 119: | ||
* Repeat timer changed from 20 days to 20 hours. | * Repeat timer changed from 20 days to 20 hours. | ||
}} | }} | ||
[[Category:Quest Index]] | |||
[[Category:Multi-Fellowship Quests]] | |||
[[Category:Quests: 20 Hour Timer]] | |||
[[Category:Quests: Level 26]] | |||
[[Category:Quests: Level 31]] | |||
Latest revision as of 19:10, 2 July 2015
| Walkthrough & Notes Dungeons & Maps Rewards Images Dialog Update History |
| Shadow Captain's Heaume Quest | |
|---|---|
| Level: | 26, 31 |
| Type: | Multi-Fellowship |
| Starts With: | Optional: Chosen of Asheron |
| Starts At: | Cragstone / Hebian-To / Zaikhal |
| Repeat: | 20 Hours |
Overview Edit
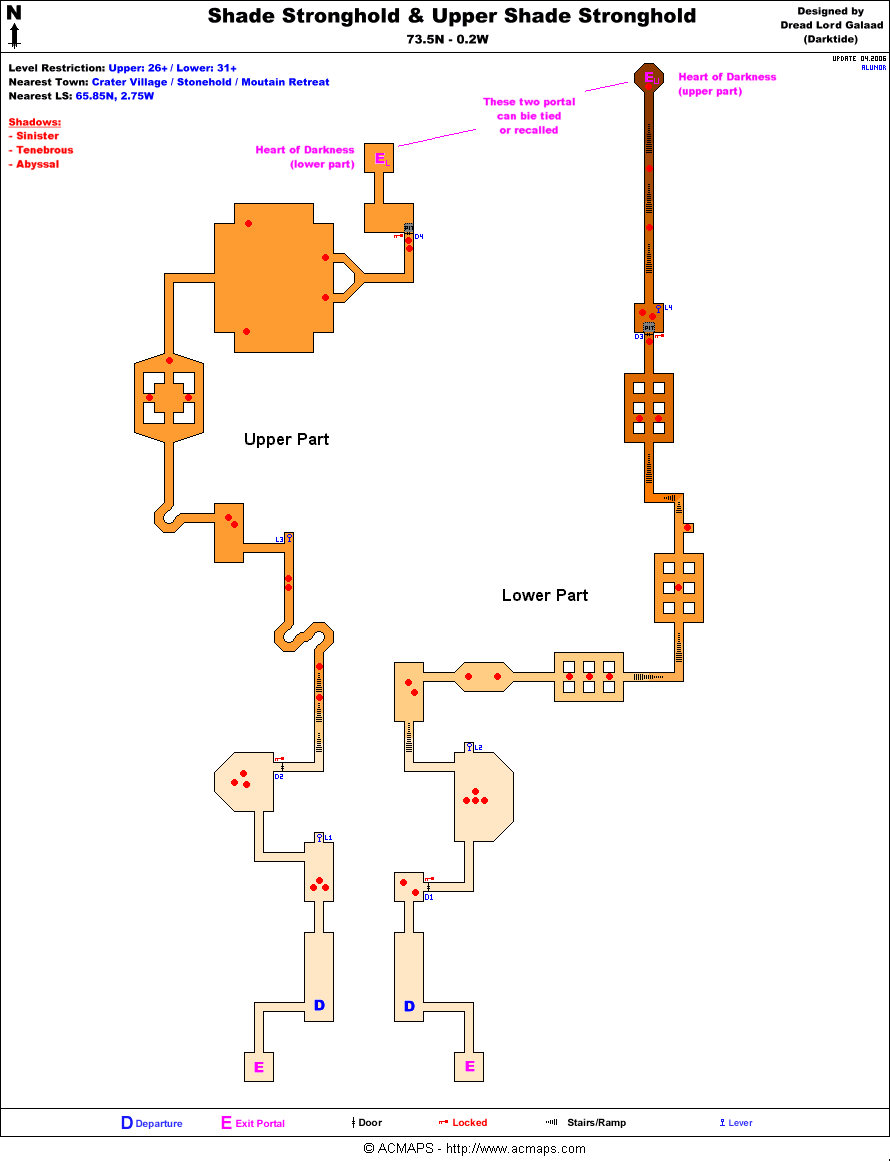
- This quest requires at least 2 players/teams to complete. There are two separate dungeons, each of which have levers that open doors in the other dungeon.
Walkthrough & Notes Edit
- For this walk through, instructions for Team 1 refer to those players that enter the Upper Shade Stronghold (26+), and instructions for Team 2 refer to those players that enter the Shade Stronghold (31+).
- Note: The rewards on this quest are split. Team 1 will receive the Shadow Captain's Heaume, and Team 2 will receive the Heart of Shadow.
Part 1: Upper & Lower Shade Stronghold Edit
- From Crater Lake Village, take the Stone Triad Dell portal at 66.2N, 14.3E, and run to 73.5N, 0.2W.
- Team 1: Enter the Upper Shade Stronghold at 73.5N, 0.2W.
- Team 2: Enter the Shade Stronghold at 73.5N, 0.2W.
- Team 1: From the drop, head North and flip the lever on the North wall, which opens the first door for Team 2. Continue down the linear hall until you reach the next lever activated door.
- Team 2: From the drop, head north through the first open door (Team 1 opened it), and flip the lever on then North wall, which opens the first door for Team 1. Continue down the linear hall until you reach the next lever.
- Both dungeons are relatively straight and linear. Repeat the lever, door relationship back and forth until both parties reach rooms with a portals to the Upper Heart of Darkness and Heart of Darkness respectively. Take the portals.
- Note: When you get to the lava pits, jump over them, don't jump in them.
Part 2: Upper & Lower Heart of Darkness Edit
- Team 1: From the drop, head South and use the second (middle) lever on your left, which opens the first door for Team 2.
- Team 2: From the drop, head North and use the first lever on your left, which opens the first door for Team 1.
- Team 1: Continue to move through the hallway until you get to a small 4-room offshoot, each of which contains a lever. Use the southwest most lever to open the final door for Team 2.
- Team 2: Once through the door, take your first left at the bottom of the ramp and use the lever to open the next gate for Team 1.
- Team 1: Once through the gate, continue until you reach the final room, where you'll the final lever on the North wall (under the statue). Flip the lever for Team 2, then kill the Upper Shadow Heart Leader and loot the Shadow Captain's Heaume from his corpse (drops 1 per kill).
- Team 2: Head through the last door, run down the ramp, and kill the Lower Shadow Heart Leader. Loot the Heart of Shadow from the ground nearby.
Notes
- If you visit the optional quest starter, Chosen of Asheron, he will hand you the texts: Asheron's Second Missive and Instructions.
Dungeons & Maps Edit
| Dungeon | Coordinates | Wiki Map | ACmaps |
|---|---|---|---|
| Shade Stronghold | 73.5N, 0.2W | -- | 02B1 |
| Upper Shade Stronghold | 73.5N, 0.2W | -- | 02B1 |
| Lower Heart of Darkness | From Shade Stronghold | -- | 02B2 |
| Upper Heart of Darkness | From Upper Shade Stronghold | -- | 02B2 |
Rewards Edit
| Lower Team | |
|---|---|
| Items: | |
| Upper Team | |
|---|---|
| Items: | |
Images Edit
Click image for full size version.
-
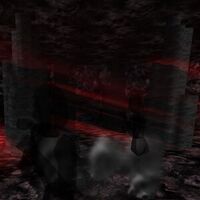
Inside the Shade Stronghold
-

Lower Heart of Darkness
-

Lower Shadow Heart Leader


Dialog Edit
- Opening Dialog
- Chosen of Asheron tells you, "My lord conveys his gratitude for the efforts of your people. If you are one of the champions who took part in the defeat of Bael'Zharon, I can take your Soul Crystal Gem and give you a spellcasting staff to commemorate your achievement.
- Chosen of Asheron gives you Asheron's Second Missive
- Chosen of Asheron tells you, "Also, I have instructions here that will lead you to the site of the Hopeslayer's defeat, should you wish to visit it.
- Chosen of Asheron gives you Instructions.
Update History Edit
|