Template:Map Point Plus: Difference between revisions
m (→Usage: added viamont town icon) |
No edit summary |
||
| Line 2: | Line 2: | ||
<div style="position:relative; top:0px; left:0px"> | <div style="position:relative; top:0px; left:0px"> | ||
<span style="z-index:0>[[Image:Map 4px Border.png|Map]]</span> | <span style="z-index:0>[[Image:Map 4px Border.png|Map]]</span> | ||
<span style="position:absolute; top:4px; left:4px; z-index:1">[[Image:Point Map 512.jpg|Dereth]]</span> | <span style="position:absolute; top:4px; left:4px; z-index:1">{{#ifeq:{{{Base Map|}}}||[[Image:Point Map 512.jpg|Dereth]]|[[Image:{{{Base Map|}}}]]}}</span> | ||
<span style="position:absolute; top:{{#ifeq: {{uc:{{{2|0}}}}} | <span style="position:absolute; top:{{#ifeq: {{uc:{{{2|0}}}}} | ||
| N | | N | ||
| Line 524: | Line 524: | ||
{{Map Point Plus | {{Map Point Plus | ||
| | | | | | | |||
| | | | | | | |||
| | | | | | | |||
}} | |||
{{Map Point Plus | |||
| Base Map = Name.jpg | |||
| | | | | | | | | | | | | | ||
| | | | | | | | | | | | | | ||
| Line 536: | Line 543: | ||
You can create new markers if desired, create a 9x9 pixel [[png]] image. If the icon doesn't cover the entire area, make the surrounding pixels transparent (with [http://www.gimp.org/ GIMP], Layer>>Transparency>>Color to Alpha, set white to alpha and save). And if the nontransparent bits are smaller than 9x9, center the image. Name the file "Map Point <Name>.png" and upload it and simply refer to it as <Name> (for example, Map Point Large.png is referenced as Large). | You can create new markers if desired, create a 9x9 pixel [[png]] image. If the icon doesn't cover the entire area, make the surrounding pixels transparent (with [http://www.gimp.org/ GIMP], Layer>>Transparency>>Color to Alpha, set white to alpha and save). And if the nontransparent bits are smaller than 9x9, center the image. Name the file "Map Point <Name>.png" and upload it and simply refer to it as <Name> (for example, Map Point Large.png is referenced as Large). | ||
The default map is [[:Image:Point Map 512.jpg]] however you can optionally specify another 512x512px image to use as the map adding the optional parameter '''Base Map = Name.jpg'''. | |||
{|border=1 cellspacing=0 cellpadding=2 style=background:#F0F0F0 | {|border=1 cellspacing=0 cellpadding=2 style=background:#F0F0F0 | ||
Revision as of 16:19, 26 February 2009
Related topics: Template:Map Point, Points of Interest, Wiki Templates
Syntax
{{Map Point Plus
 | <Coords> | <N or S> | <Coords> | <E or W> | <Marker> | <Caption>
 | <Coords> | <N or S> | <Coords> | <E or W> | <Marker> | <Caption>
 | <Coords> | <N or S> | <Coords> | <E or W> | <Marker> | <Caption>
}}

{{Map Point Plus
 | | | | | |
 | | | | | |
 | | | | | |
}}

{{Map Point Plus
 | Base Map = Name.jpg
 | | | | | |
 | | | | | |
 | | | | | |
}}
Usage
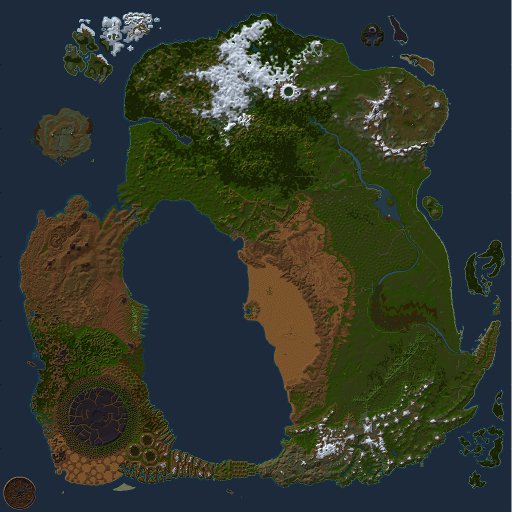
Displays multiple locations (up to 60) on a large map of Dereth given specific coordinates. You can use either upper or lower case letters (e, w, n, s or E, W, N, S). If the marker is blank, the Large will be used, if the caption is left blank, no caption will be used. Note that because the coordinates need to be transformed into a point on the map, if a coordinate or direction parameter is missing or malformed the page will not render correctly.
For each point you specify a marker will be placed at that point and a caption describing the point will popup if the mouse cursor hovers over it. For a smaller map that displays one to four points use Template:Map Point. Note that unlike Map Point, for Map Point Plus you must leave a blank for the caption even if left blank. The page will not render if a caption or marker is skipped.
You can create new markers if desired, create a 9x9 pixel png image. If the icon doesn't cover the entire area, make the surrounding pixels transparent (with GIMP, Layer>>Transparency>>Color to Alpha, set white to alpha and save). And if the nontransparent bits are smaller than 9x9, center the image. Name the file "Map Point <Name>.png" and upload it and simply refer to it as <Name> (for example, Map Point Large.png is referenced as Large).
The default map is Image:Point Map 512.jpg however you can optionally specify another 512x512px image to use as the map adding the optional parameter Base Map = Name.jpg.
For example:
{{Map Point Plus
 | 50.7 | S | 81.8 | W | Large | Tumerok Fort
 | 31.1 | S | 73.7 | E | Small | Toppled Stone Head - 31.1S, 73.7E
 | 46.9 | S | 73 | W | Green |
 | 44.3 | S | 49.0 | W | Purple | Vesayen Isles Portal
 | 86.9 | N | 70.0 | W | Yellow | Huntsman of Silyun - 86.9N, 70.0W
 | 64.4 | S | 55.5 | E | Dungeon | Lugian Quarry
 | 33.6 | N | 56.8 | E | LS | Life Stone
 | 25.7 | N | 49.2 | E | Aluv Town | Cragstone
 | 39.1 | S | 83.2 | E | Sho Town | Hebian-To
 | 13.7 | N | 00.6 | E | Gharu Town | Zaikhal
 | 01.7 | N | 36.1 | E | Cottage | Adventurer's Haven Cottages
 | 56.9 | S | 35.3 | E | Villa | Erevana Villas
 | 08.7 | S | 49.7 | E | Mansion | Folthid Mansion
}}
displays as:

