Sylsfear Quest: Difference between revisions
mNo edit summary |
No edit summary |
||
| Line 36: | Line 36: | ||
# Head to 19.3N, 17.6E and approach [[Zalphoos the Shopkeeper]]. Purchase the [[Zalphoos' Key]] and optionally the [[Zalphoos Guidebook]] for more information on the area. | # Head to 19.3N, 17.6E and approach [[Zalphoos the Shopkeeper]]. Purchase the [[Zalphoos' Key]] and optionally the [[Zalphoos Guidebook]] for more information on the area. | ||
# Head to 19.5N, 17.5E and take the portal to the Base of Mt. Alphus. Enter the nearby portal to Mt. Alphus Valley. | # Head to 19.5N, 17.5E and take the portal to the Base of Mt. Alphus. Enter the nearby portal to Mt. Alphus Valley. | ||
# Head to 15.8N, 2.1E and enter the [[Alfreth Dungeon]]. It is a medium sized cave. Either path you take will lead you to a locked door (resistance: | # Head to 15.8N, 2.1E and enter the [[Alfreth Dungeon]]. It is a medium sized cave. Either path you take will lead you to a locked door (resistance: 364). Open this door with the Zalphoos' Key or pick the lock. | ||
# Jump into the pit beyond the locked doors and work your way to the end of the banderling area. Kill the Banderling Captain and take its [[Worn Key]]. | # Jump into the pit beyond the locked doors and work your way to the end of the banderling area. Kill the Banderling Captain and take its [[Worn Key]]. | ||
# Proceed to the [[Sylsfear Dungeon]] located at 11N, 14.7E. There are two routes: | |||
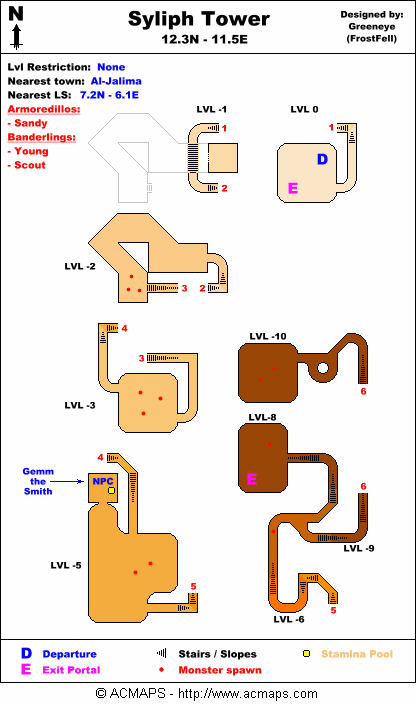
#* Head to 17.8N 16.0E and enter the [[Bellig Tower]]. Work your way to the top, optionally stopping to kill the [[Revenant (Bellig Tower)|Belling Tower Revenant]] and taking its [[Hammer of Lightning]]. At the top take the exit portal to the summit of Mount Bellig. Head to the south end of the plateau and take the portal to Mount Gemm, from Gemm head to Mount Dalt, and from Dalt head to Mount Syliph. Enter the [[Syliph Tower]] located at 12.3N, 11.5E. Work your way down, stopping at [[Gemm the Smith]] if you wish, and exiting at the bottom to the base of Mt. Syliph. Near that drop point is another portal, leading just down the steep hills to Mt. Syliph Plain. Just west of this drop point, you will find the Slysfear Dungeon. | |||
#* Simply run outdoors to 11N, 14.7E. The Mount Alphus range provides an obstacle, so one must first run to the southern end of the valley and then to Sylsfear. | |||
# Inside Sylsfear you will find two hallways near the drop. Proceed down the left (south) hallway first. At the first turn, go right (west). You will come to a long hallway with many side hallways. Ignore all these and proceed straight (east). You will come to an intersection with a malformed lifestone in front of you and a [[Dusty Sign]] warning you not to take the right (east) path. Take this path anyway. | |||
# You will come to a locked door (resistance: 249). However, it is locked from the inside, and you can simply open it. Proceed with caution as this next area is filled with shadows and several magical traps. You will reach a final room. Kill the [[Trusted Tusker]] and loot its [[Worn Key]]. Kill the [[Revenant Antiquary]] and loot its [[Laboratory Key]] (timer: 13 Days). | |||
# Return to the start of the dungeon. If you choose to retrace your steps and you find that the door leading to the shadow area has locked behind you, the Worn Key from the tusker will open it. Alternatively, you may portal recall if you have the ability. | |||
# From the entrance, take the right (west) hallway. Just beyond the two golems you will come to a locked door (resistance: 583). Open this door with the Worn Key taken from the Banderling Captain in the Alfreth Dungeon or pick the lock. This leads to the Laboratory area. Proceed with caution: The final area of the laboratory contains fire and lightning elementals, including an [[Astyrrian]] and [[Inferno]]. | |||
# Open the [[Laboratory Supply Chest]] (resistance: 2000) with the Laboratory Key. The loot generated contents are your reward for this quest. | |||
::CAUTION: when opened, the chest casts Lightning Vulnerability VI on you at 500 spellcraft. If the Astyrrian is still alive, this can lead to the quick demise of an unprepared adventurer. | |||
== Maps == | == Maps == | ||
Revision as of 17:13, 16 February 2010
| Walkthrough & Notes Dungeons & Maps Rewards Images Dialog Update History |
| Sylsfear Quest | |
|---|---|
| Level: | ?? |
| Type: | Solo |
| Starts At: | ?? |
| Repeat: | ?? |
Quest Overview
A very old quest (possibly introduced in Beta or Release) involving exploring the Mount Alphus Range and surrounding dungeons. The only rewards are a pull from the Laboratory Supply Chest which contains a low amount of low tier loot generated items.
While lockpicking is not required, a lockpicker can skip most of this quest.
Walk Through
- [OPTIONAL] Purchase the Alphus Range Directions and Legend of the Undead Defender avialable from various barkeeps. While not specifically related to this quest, they provide clues to several locations you will visit.
- Head to the Mount Alphus Range. See that page for route information.
- Head to 21.7N 19.4E and enter the Zabool Tower. Work your way to the top and take the exit portal to reach the summit of Mount Zabool. Head to the southern end of the plateau and take the portal to Mount Alphus.
- Head to 19.3N, 17.6E and approach Zalphoos the Shopkeeper. Purchase the Zalphoos' Key and optionally the Zalphoos Guidebook for more information on the area.
- Head to 19.5N, 17.5E and take the portal to the Base of Mt. Alphus. Enter the nearby portal to Mt. Alphus Valley.
- Head to 15.8N, 2.1E and enter the Alfreth Dungeon. It is a medium sized cave. Either path you take will lead you to a locked door (resistance: 364). Open this door with the Zalphoos' Key or pick the lock.
- Jump into the pit beyond the locked doors and work your way to the end of the banderling area. Kill the Banderling Captain and take its Worn Key.
- Proceed to the Sylsfear Dungeon located at 11N, 14.7E. There are two routes:
- Head to 17.8N 16.0E and enter the Bellig Tower. Work your way to the top, optionally stopping to kill the Belling Tower Revenant and taking its Hammer of Lightning. At the top take the exit portal to the summit of Mount Bellig. Head to the south end of the plateau and take the portal to Mount Gemm, from Gemm head to Mount Dalt, and from Dalt head to Mount Syliph. Enter the Syliph Tower located at 12.3N, 11.5E. Work your way down, stopping at Gemm the Smith if you wish, and exiting at the bottom to the base of Mt. Syliph. Near that drop point is another portal, leading just down the steep hills to Mt. Syliph Plain. Just west of this drop point, you will find the Slysfear Dungeon.
- Simply run outdoors to 11N, 14.7E. The Mount Alphus range provides an obstacle, so one must first run to the southern end of the valley and then to Sylsfear.
- Inside Sylsfear you will find two hallways near the drop. Proceed down the left (south) hallway first. At the first turn, go right (west). You will come to a long hallway with many side hallways. Ignore all these and proceed straight (east). You will come to an intersection with a malformed lifestone in front of you and a Dusty Sign warning you not to take the right (east) path. Take this path anyway.
- You will come to a locked door (resistance: 249). However, it is locked from the inside, and you can simply open it. Proceed with caution as this next area is filled with shadows and several magical traps. You will reach a final room. Kill the Trusted Tusker and loot its Worn Key. Kill the Revenant Antiquary and loot its Laboratory Key (timer: 13 Days).
- Return to the start of the dungeon. If you choose to retrace your steps and you find that the door leading to the shadow area has locked behind you, the Worn Key from the tusker will open it. Alternatively, you may portal recall if you have the ability.
- From the entrance, take the right (west) hallway. Just beyond the two golems you will come to a locked door (resistance: 583). Open this door with the Worn Key taken from the Banderling Captain in the Alfreth Dungeon or pick the lock. This leads to the Laboratory area. Proceed with caution: The final area of the laboratory contains fire and lightning elementals, including an Astyrrian and Inferno.
- Open the Laboratory Supply Chest (resistance: 2000) with the Laboratory Key. The loot generated contents are your reward for this quest.
- CAUTION: when opened, the chest casts Lightning Vulnerability VI on you at 500 spellcraft. If the Astyrrian is still alive, this can lead to the quick demise of an unprepared adventurer.
Maps
| Dungeon | Coordinates | Wiki Map | ACmaps |
|---|---|---|---|
| Alfreth Dungeon | 15.8N, 2.1E | -- | 01D6 |
| Bellig Tower | 17.8N 16.0E (base), 17.5N, 16.1E (top) | -- | 01D4 |
| Syliph Tower | 12.3N, 11.5E | -- | 01D5 |
| Sylsfear Dungeon | 11N, 14.7E | -- | 01D7 |
| Zabool Tower | 21.7N 19.4E (base), 21.1N, 18.5E (top) | -- | 01D3 |
Items
File:A Scribbled Note Icon.png A Scribbled Note![]() Alphus Range Directions
Alphus Range Directions![]() Dusty Sign
Dusty Sign![]() Laboratory Key
Laboratory Key![]() Laboratory Supply Chest
Laboratory Supply Chest![]() Legend of the Undead Defender
Legend of the Undead Defender![]() Worn Key
Worn Key![]() Zalphoos Guidebook
Zalphoos Guidebook![]() Zalphoos' Key
Zalphoos' Key
Images
Click image for full size version.
-

Caption
-
Caption

Lore & Dialog
Notes
- ??