Deewain's Dark Cavern: Difference between revisions
m (1 revision: Source http://ac.wikkii.net) |
>Arkalor's Bot m (Text replace - "{{Quest Summary Temp" to "{{Quest Summary") |
||
| Line 1: | Line 1: | ||
{{Quest Summary | {{Quest Summary | ||
| | | Level = 180 | ||
| Recommended Level = | |||
| | | Quest Type = Solo | ||
| Kill Task = | |||
| | | Starts With = | ||
| | | Starts At = [[Dark Cavern]] at 87.9N, 9.3W | ||
| | | Route = [[Tou-Tou]] to [[Snowy Valley]] portal at 27.1S, 96.0E | ||
| | | Repeat Timer = 20 Hours | ||
| | |||
| | |||
| Time to Complete = | | Time to Complete = | ||
| Contracts = [[Contract for Deewain's Dark Cavern]] | | Contracts = [[Contract for Deewain's Dark Cavern]] | ||
}} | }} | ||
== | == Overview == | ||
[[Fayza]] is interested in the Energy Infused Rocks from Deewain's Dark Cavern. | |||
== | == Walkthrough & Notes == | ||
# Run to the [[Dark Cavern]] | # Run to the [[Dark Cavern]] at 87.9N, 9.3W.) | ||
#* | #* Route: [[Tou-Tou]] to [[Snowy Valley]] portal at 27.1S, 96.0E | ||
#* You are dropped at a random starting location when you enter. | #* You are dropped at a random starting location when you enter the Maze. See map for details. | ||
=== Maze === | === Part 1: Maze === | ||
# Follow the [[#Dungeons & Maps|map]] until you reach the largest northern room (labelled as North Pit). | |||
# | #* {{Warning}} The south side pit does NOT have a ledge, and will result in you falling all the way to the bottom, with no means of getting out other than recalling. | ||
# When you reach the north big room with a pit, you can zoom out, and see an opening one level down. | # When you reach the north big room with a pit, you can zoom out, and see an opening one level down. | ||
# The pit has an invisible floor, do a shift jump down to it. It was about a 3/4 jump. The invisible floor is out a bit from the edge, so don't try to just jump as close to the edge as you can. | # The pit has an invisible floor, do a shift jump down to it. It was about a 3/4 jump. The invisible floor is out a bit from the edge, so don't try to just jump as close to the edge as you can. | ||
# Proceed into the tunnel from the invisible floor, | # Proceed into the tunnel from the invisible floor, and take the "Surface" Portal which, despite the name, does NOT take you to the surface where you started. | ||
# This portals you to another big room with stones to jump | # This portals you to another big room with stones to jump; '''however''', if you do not want to do the jumping puzzle, you can kill the Defender golems up the ramp on the right hand side of the room instead. | ||
=== Jumping Puzzle === | === Part 2: Jumping Puzzle or defeating the Defender Golems === | ||
==== Jumping Puzzle ==== | |||
# Successfully jump across the platforms to the portal. | |||
# There is a series of 3 rooms | #* Note: The locations of the platforms change, so the route will vary. | ||
==== Defender Golems ==== | |||
# There is a series of 3 rooms to pass through, each with 3 Follower of Deewain Golems and a different element of "Defender" Golem. | |||
# The Followers are on a very fast respawn timer, but do minimal damage both melee and magic wise | # The Followers are on a very fast respawn timer, but do minimal damage both melee and magic wise | ||
# Slay the | # Slay the Defender of a room to open the two doors into the room beyond. Once the Defender is killed, the Followers in its room will disappear. | ||
# | #* Note: Watch out when a double spawn occurs: killing a defender the second time closes the door again. | ||
* Note: | # Head on through the doors. | ||
=== Part 3: Portal Puzzle === | |||
# Next, there will be three portals, each bringing you to a next section with more portals. Using the wrong one takes you back to the start of the jumping puzzle. Use the following portals: | |||
## Left | |||
## Left | |||
# | ## Middle | ||
# | ## Right | ||
# | ## Middle | ||
# | |||
# | |||
# | |||
# | |||
# | |||
# | |||
=== | === Part 4: Fallen Spikes & Rocks === | ||
# If you do it right, you will end up in another big room with LOTS of Falling Spikes. | |||
# Go left wall, watch sequence, when last one nearby falls, run like hell | |||
# | # Next, there are [[Missile Defender]] Golems who hurl rocks at you. | ||
# | # Step back into the hallway and kill the 4 [[Fallen Rock]]s that lie on the ramp. | ||
# | # On the other side, there is another large room with [[Follower of Deewain|Followers of Deewain]], 1 [[Fiery Defender]], 1 [[Charged Defender]] and a [[Chilled Defender]]. | ||
# | # Kill the defenders and a 5 minute portal to [[Deewain]]'s Chambers will spawn. | ||
# | |||
=== Part 5: Deewain's Chamber === | |||
# The [[Iron Golem (350)]] is surrounded by a few Rocks and Followers of [[Deewain]]. He is weak to bludgeoning and acid. The Iron Golem has 200,250 health and nasty debuffs. If you defeat him, the rocks blocking the passage out of the room disappear. | |||
# Follow the passage and pick up {{Icon Link Small|Energy Infused Rock}}. | |||
# Give the rock to [[Fayza]] in [[Xarabydun]] for your rewards. | |||
Notes | |||
# If you die in Deewain's Chamber, run back to the [[Dark Cavern]] and you will be portalled back to the chamber. | |||
# There are originally only a few Energy Infused Rock, but they respawn after being picked up, no need to kill the Golem again. | |||
== | == Dungeons & Maps == | ||
{{Dungeon Table | {{Dungeon Table | ||
| Table Rows = | | Table Rows = | ||
{{Dungeon Maps | {{Dungeon Maps | ||
| Dungeon = Dark Cavern | | Dungeon = Dark Cavern | ||
| Coordinates = 87.9N | | Coordinates = 87.9N, 9.3W | ||
| Wiki Map File = Dark Cavern Map.png | | Wiki Map File = Dark Cavern Map.png | ||
}} | }} | ||
}} | }} | ||
== | == Rewards == | ||
{{ | {{Rewards Table | ||
| Quest Task = | |||
| Item Reward = | |||
* {{Icon Link|Legendary Key}} | |||
| Max XP Reward = 500,000,000 | Percent of Level = Fixed | Level Cap = | |||
| Luminance Reward = 30,000 | |||
| | | Title Reward = | ||
| | |||
{{ | |||
| | |||
| | |||
| | |||
}} | }} | ||
| Line 147: | Line 88: | ||
<gallery widths=200px heights=200px perrow=4> | <gallery widths=200px heights=200px perrow=4> | ||
File:Dark Cavern Spike Room Live.jpg|Spike Room | File:Dark Cavern Spike Room Live.jpg|Spike Room | ||
File:Fallen Rock Live.jpg| | File:Fallen Rock Live.jpg|Fallen Rock | ||
File:Dark Cavern Defenders Live.jpg|Room with the Golem Defenders | File:Dark Cavern Defenders Live.jpg|Room with the Golem Defenders | ||
</gallery> | </gallery> | ||
== | == Dialog == | ||
=== Rewards Dialog === | |||
:You allow Fayza to examine your Energy Infused Rock. | |||
:Fayza tells you, "What a magnificent sample! So light for such a large stone, truly amazing." | |||
:Fayza tells you, "I wonder if I could use this material to create something special....." | |||
:Fayza tells you, "Ah right, I should also reward you bringing me this" | |||
:You allow Fayza to examine your Energy Infused Rock. | :You hand over 1 of your Energy Infused Rocks. | ||
: | :You've earned 30,000 Luminance. | ||
:Fayza tells you, "I wonder if I could use this material to create something special....." | :You've earned 500,000,000 experience. | ||
:Fayza tells you, "Ah right, I should also reward you bringing me this" | :Fayza gives you Legendary Key. | ||
:You hand over 1 of your Energy Infused Rocks. | |||
:You've earned | == Update History == | ||
:You've earned | {{Update History| | ||
:Fayza gives you Reinforced Mana Forge Key. | [[Blood From Stone]] | ||
* Quest introduced. | |||
[[Lost City of Neftet]] | |||
* [[Deewain]] replaced with [[Iron Golem (350)|Iron Golem]]. | |||
[[Feelings of Dread]] | |||
* [[Reinforced Mana Forge Key]] reward changed to 3 use [[Legendary Key]]. | |||
[[The Quest for Freedom]] | |||
* Repeat timer changed from 27 days to 20 hours. | |||
}} | |||
== | == Trivia == | ||
When this quest was first introduced, players got to actually fight [[Deewain (Creature)|Deewain]] himself. | |||
[[File:Deewain Welcoming Party Live.jpg|thumb|left]] | |||
Revision as of 05:32, 13 March 2014
| Walkthrough & Notes Dungeons & Maps Rewards Images Dialog Update History |
| Deewain's Dark Cavern | |
|---|---|
| Level: | 180 |
| Type: | Solo |
| Starts At: | Dark Cavern at 87.9N, 9.3W |
| Route: | Tou-Tou to Snowy Valley portal at 27.1S, 96.0E |
| Repeat: | 20 Hours |
| Contracts: | Contract for Deewain's Dark Cavern |
Overview
Fayza is interested in the Energy Infused Rocks from Deewain's Dark Cavern.
Walkthrough & Notes
- Run to the Dark Cavern at 87.9N, 9.3W.)
- Route: Tou-Tou to Snowy Valley portal at 27.1S, 96.0E
- You are dropped at a random starting location when you enter the Maze. See map for details.
Part 1: Maze
- Follow the map until you reach the largest northern room (labelled as North Pit).
- Warning: The south side pit does NOT have a ledge, and will result in you falling all the way to the bottom, with no means of getting out other than recalling.
- When you reach the north big room with a pit, you can zoom out, and see an opening one level down.
- The pit has an invisible floor, do a shift jump down to it. It was about a 3/4 jump. The invisible floor is out a bit from the edge, so don't try to just jump as close to the edge as you can.
- Proceed into the tunnel from the invisible floor, and take the "Surface" Portal which, despite the name, does NOT take you to the surface where you started.
- This portals you to another big room with stones to jump; however, if you do not want to do the jumping puzzle, you can kill the Defender golems up the ramp on the right hand side of the room instead.
Part 2: Jumping Puzzle or defeating the Defender Golems
Jumping Puzzle
- Successfully jump across the platforms to the portal.
- Note: The locations of the platforms change, so the route will vary.
Defender Golems
- There is a series of 3 rooms to pass through, each with 3 Follower of Deewain Golems and a different element of "Defender" Golem.
- The Followers are on a very fast respawn timer, but do minimal damage both melee and magic wise
- Slay the Defender of a room to open the two doors into the room beyond. Once the Defender is killed, the Followers in its room will disappear.
- Note: Watch out when a double spawn occurs: killing a defender the second time closes the door again.
- Head on through the doors.
Part 3: Portal Puzzle
- Next, there will be three portals, each bringing you to a next section with more portals. Using the wrong one takes you back to the start of the jumping puzzle. Use the following portals:
- Left
- Left
- Middle
- Right
- Middle
Part 4: Fallen Spikes & Rocks
- If you do it right, you will end up in another big room with LOTS of Falling Spikes.
- Go left wall, watch sequence, when last one nearby falls, run like hell
- Next, there are Missile Defender Golems who hurl rocks at you.
- Step back into the hallway and kill the 4 Fallen Rocks that lie on the ramp.
- On the other side, there is another large room with Followers of Deewain, 1 Fiery Defender, 1 Charged Defender and a Chilled Defender.
- Kill the defenders and a 5 minute portal to Deewain's Chambers will spawn.
Part 5: Deewain's Chamber
- The Iron Golem (350) is surrounded by a few Rocks and Followers of Deewain. He is weak to bludgeoning and acid. The Iron Golem has 200,250 health and nasty debuffs. If you defeat him, the rocks blocking the passage out of the room disappear.
- Follow the passage and pick up
 Energy Infused Rock.
 - Give the rock to Fayza in Xarabydun for your rewards.
Notes
- If you die in Deewain's Chamber, run back to the Dark Cavern and you will be portalled back to the chamber.
- There are originally only a few Energy Infused Rock, but they respawn after being picked up, no need to kill the Golem again.
Dungeons & Maps
| Dungeon | Coordinates | Wiki Map | ACmaps |
|---|---|---|---|
| Dark Cavern | 87.9N, 9.3W | -- |
Rewards
| Experience: | 500,000,000 (Fixed) |
| Luminance: | 30,000 |
| Items: | |
Images
Click image for full size version.
-
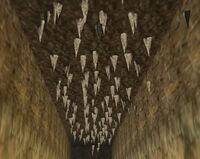
Spike Room
-
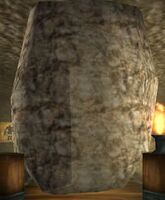
Fallen Rock
-
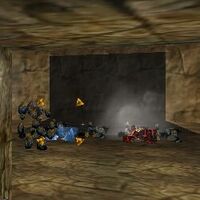
Room with the Golem Defenders


Dialog
Rewards Dialog
- You allow Fayza to examine your Energy Infused Rock.
- Fayza tells you, "What a magnificent sample! So light for such a large stone, truly amazing."
- Fayza tells you, "I wonder if I could use this material to create something special....."
- Fayza tells you, "Ah right, I should also reward you bringing me this"
- You hand over 1 of your Energy Infused Rocks.
- You've earned 30,000 Luminance.
- You've earned 500,000,000 experience.
- Fayza gives you Legendary Key.
Update History
|
Trivia
When this quest was first introduced, players got to actually fight Deewain himself.
